In one of my more recent posts I had mentioned that school was out for the summer and that you would be hearing from me more often...that hasn't really been true. I took a bit of a crafting freeze over the last few days while we were getting ready for a new addition to our family.
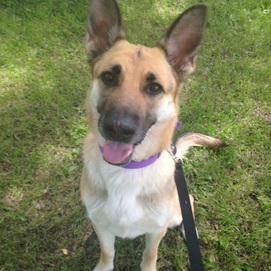 |
This is Bella. She is a sweet but crazy German Shephard mix that we got from the humane society. We already had a chocolate lab, Bear. Bear is 8, he was 4 when we got him. Bella is 3. Bear has been very spoiled over the last 4 years so we had to make a couple of trips before we got Bella to make sure that they wouldn't fight when we brought her home. Plus we had to make sure that Bear was up to date on all of his shots which required a vet visit...anyway it just made for a few very busy days. If I am being honest I was VERY nervous about getting a new dog after Bear had been our only dog for so long. I was afraid he would get jealous or feel rejected. So far he has handled it very well and while they have had minor disagreements they seem to get along very well.
|
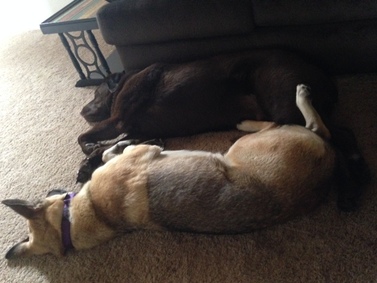
Today is only her third full day with us and I was able to get this picture of them yesterday. As long as there is space next to me for both of them they are happy. Okay, enough about my baby's...I mean dogs. It is time for what I was finally able to accomplish in my sewing room tonight!
|  |
It all started on Pintrest...like most things do. I clicked on a quilt block I loved, but unfortunately there was no link to a pattern and no instructions. I was totally bummed out until I really got looking at it and realized I can make that! But I didn't want to leave all of you hanging...so I was sure to take pictures and write down all the instructions!
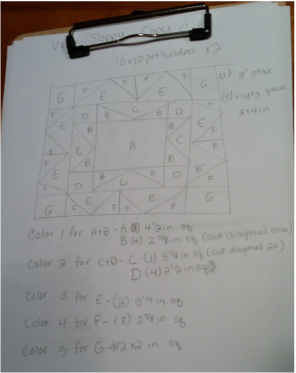 |
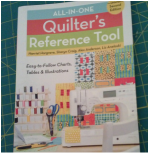
It all started like this...I am thinking that maybe I should get some graph paper or something to make this stage prettier, but it works. Or to do this step on computer so I am not always retyping it, but when I am planning I like the feel of paper and pencil. I have to confess I am not magic and I do not know all the formulas for what size pieces to cut. I do, however, have this handy little book!
|
If you look closely at the picture above you can see that I had intended this block to finish at 10 inches and I made two that I was going to use as potholders. They turned out to finish at 10 3/4 and I just feel that they are too big for potholders. I will for sure keep one if not both to use as trivets. If I decide not to use both it will go in a box for last minute gifts.
To begin I used 5 different fabrics. You don't need very much of each. I used fabric scraps that coordinated. | 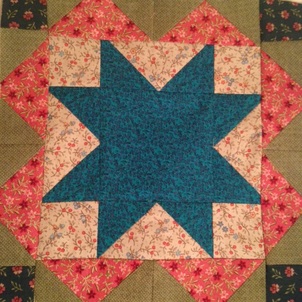 |
Cut from color 1 (for the star):
1-4 1/2 in square
4-2 7/8 in squares (cut diagonally once so that you have 8 triangles)
Cut from color 2 (for the background behind the star):
1 - 5 1/4 in square (cut diagonally twice so that you have 4 triangles)
4- 2 1/2 in squares
Cut from color 3 ( for the pink part):
2- 5 1/4 in squares
Cut from color 4 (for the green):
8- 2 7/8 in squres
Cut from color 5 (for the corners):
4- 2 in squares
 |
First I made the star. Using the same method as in this tutorial. Just be sure to use the measurements I gave!
Learn from my mistakes and DON'T square this up. I squared mine to 8" and I should have known better, because I lost my points in the final product. |
Next it is time for flying geese. You will make 8 flying geese all together. You can use your preferred method. The cutting measurements I gave were for this method.
Be sure you square your flying geese to 4 1/2 X 2 if they are looking wonky or too big.
At this point I got to excited and forgot to take pictures. But you are going to sew sets of two flying geese together. You will have four pairs. On each end of two pairs sew the 2 in squares. Then you are going to sew one pair of flying geese on each side of the star block. I started with the top and the bottom, then I sewed on the flying geese pairs with the squares on the sides.
At this point I got to excited and forgot to take pictures. But you are going to sew sets of two flying geese together. You will have four pairs. On each end of two pairs sew the 2 in squares. Then you are going to sew one pair of flying geese on each side of the star block. I started with the top and the bottom, then I sewed on the flying geese pairs with the squares on the sides.
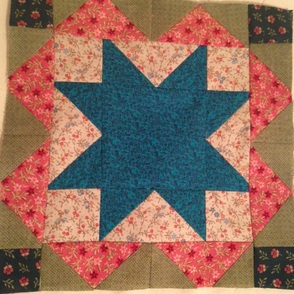 |
This is just another picture of the final product...well finialish. I still need to quilt it and bind it, but you get the idea. If you make this block and would like to share a picture feel free to email me at kategoss91@gmail.com.
I feel as though I have written a book tonight! Tomorrow is Friday, so go ahead and do a little happy dance. Enjoy your weekend! |
No comments:
Post a Comment